This pic makes me smile. I have to brag about my dogs for a minute. These are our two boxers. Coco (fawn) is 8 and Wrigley (white) is 2. This is the pic we had in our Christmas cards. I was threatening them with their lives to get this. They were cocking their heads from side to side trying to figure out why I was talking in this tight lipped, teeth clenched voice about going to the vet for shots if they didn't stand still for me. Wrigley is a terror and gets into EVERYTHING. Coco is the scaredy cat but tries to act tough when she barks at kids while sitting on the bed in the guest bedroom looking out the window. They are really great dogs and nothing is better than coming home from work and seeing those stubby tails wagging when you walk thru the door.
Ok - This was SUPPOSED to be a "small" hole!! After nearly 12 years without central air we decided to install a Space Pak central air system.
 www.spacepak.com Since we have hot water heat with radiators and no duct work we have been living with window units. It basically feels like staying at a bad motel - it's either too hot or too cold and the noise really gets to you after awhile. Maybe we are just too picky. At any rate I had the brainy idea that we could just convert the house over to forced air heat and central air. I would do most of the dirty work cutting out sections of the walls to run the supply and return ducts. Well - - I had two estimates - one guy said he would not touch my house for under 30K and the other guy said the custom duct work that would be required in the basement (due to the low ceiling) would just be too time consuming and he didn't want to get involved in a project that big. There are only so many heating and cooling guys out there willing to do this type of retro fit and I finally decided to abandon the whole idea. Then came plan B which was suggested by the second contractor. He recommended converting from steam heat to hot water heat and the installation of a Space Pak high velocity air conditioning system. The heating was completed in October (just in time for cold weather) The central air is still in progress. To save money I agreed to run the flexible 2 inch diameter (not including the insulation) ducting. I am nearly done running this ducting (it looks like flexible dryer venting) and of course it has not been without it's problems. The above pic was taken on the main stairway landing. You are looking at the Space Pak duct where it enters the kitchen ceiling. I will take more pics to show how this all works. There were other holes I had to cut similar to this and they are in the process of being repaired. Anyway I had to cut an opening in the wall to feed the tubing down and when I started cutting the hole with my saws-all the plaster just starts vibrating and coming lose. This has happened to me MANY times so I am used to it. The way the plaster came off sorta looks like the state of Texas - lol - hey - you have to find some humor in these things when you know what a pain it's going to be to repair it all.
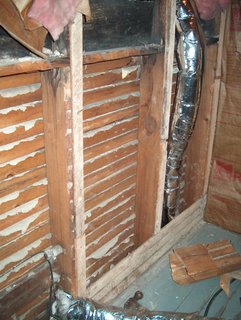
This pic shows the ducting coming out of the 3rd floor crawl space on the 3rd floor landing. This duct is feeding down to the kitchen as shown in the pic above. The 3rd floor is gutted right now so that is really helping with the installation. I will be installing a total of 22 of these little ducts. As of right now I have all but 5 of them installed. Yeah!


